


零、更新系统至Debian 11
Debian11 已经在2021年8月15日正式发布,内核升级为了5.10,这里记录了如何在命令行模式下将Debian10 升级为Debian11.
deb http://deb.debian.org/debian/ bullseye main non-free contrib
deb http://deb.debian.org/debian-security/ bullseye-security main
deb http://deb.debian.org/debian/ bullseye-updates main non-free contrib
deb http://deb.debian.org/debian/ bullseye-backports main non-free contrib
1.先将Debian10现有的补丁都打全
apt update -y && apt upgrade -y && apt dist-upgrade
2.修改 /etc/apt/sources.list 文档,将源buster 替换为bullseye(注意备份sources.list)
cp /etc/apt/sources.list /etc/apt/sources.list.bak && sed -i 's/buster/bullseye/g' /etc/apt/sources.list && sed -i 's/bullseye\/updates/bullseye-security/g' /etc/apt/sources.list
3.重新update和full-upgrade,遇到对话框,yes/ok即可
apt update -y && apt full-upgrade -y
4.reboot,检查系统版本
cat /etc/os-release
6.更新内核版本
apt-cache search linux-image
apt install linux-image-<flavour>
一、安装非官方内核
使用一键安装脚本(BBR2或BBR PLUS)
bash <(curl -Lso- https://git.io/oneclick)
BBR PLUS内核作者jinwyp
BBR2内核作者xanmod
二、八合一脚本
科学地上网(推荐使用ACME自己申请泛域名证书,便于后期通过SNI进行域名分流,搭建其他站点)
wget -P /root -N --no-check-certificate "https://raw.githubusercontent.com/suysker/xray-agent/master/install.sh" && chmod 700 /root/install.sh && /root/install.sh
- 脚本优化自mack-a的v2rya-agent,移除了所有除了发往github的网站请求
- 脚本优化过所有函数的执行逻辑,只保留最低限度内容
- 移除了过气core的支持,仅支持xray-core
- 支持Realiy协议;支持镜像网站作为伪装站
- 兼容DNS、API、80端口申请(通用)证书;开启CDN不影响证书申请;支持证书管理与自动更新
- 加入了warp、bbr、bbr plus、hysteria、Adguard的外部一键脚本链接
- 支持流量嗅探、分流、IPV6优先级等常用进阶设置
- 支持多账户管理;支持保留配置重装等
设置更新geosite和geoip的定时任务(上述脚本可自动添加)
#一键添加更新脚本(/etc/v2ray-agent/xray/为文件存放地址)
cat > /root/auto_update_geodata.sh << EOF
#!/bin/sh
wget -O /etc/v2ray-agent/xray/geosite.dat https://github.com/Loyalsoldier/v2ray-rules-dat/releases/latest/download/geosite.dat && wget -O /etc/v2ray-agent/xray/geoip.dat https://github.com/Loyalsoldier/v2ray-rules-dat/releases/latest/download/geoip.dat && systemctl restart xray
EOF
#修改权限 chmod +x /root/auto_update_geodata.sh #编辑定时任务 crontab -e #每周一早上四点半更新 30 4 * * 1 /root/auto_update_geodata.sh
BBR+(如果已经使用非官方内核,无需运行)
bash <(curl -Ls https://github.com/lanziii/bbr-/releases/download/123/tools.sh)
如果openvz类型的机器请使用如下一键BBR脚本
wget --no-cache -O lkl-haproxy.sh https://github.com/mzz2017/lkl-haproxy/raw/master/lkl-haproxy.sh && bash lkl-haproxy.sh
hysteria(推荐使用udp并监听443端口)(上述脚本已添加)
bash <(curl -fsSL https://git.io/hysteria.sh)
路由追踪
curl https://raw.githubusercontent.com/zhucaidan/mtr_trace/main/mtr_trace.sh|bash
三、WARP
#首次运行
wget -N https://raw.githubusercontent.com/fscarmen/warp/main/menu.sh && bash menu.sh [option] [lisence]

#再次运行
warp [option] [lisence]
流媒体解锁检测
bash <(curl -L -s check.unlock.media)
【刷 WARP IP】 - 为 WARP 解锁流媒体而生
bash <(curl -sSL https://raw.githubusercontent.com/fscarmen/warp_unlock/main/unlock.sh)
IPv4 与 IPv6 网络优先级设置
TIPS: 优先级不是一定要设置的,这仅限于 VPS 本身对外发起的网络请求。使用某科学的上网工具不一定有效,建议使用工具内置的路由分流功能。
当访问的网站是双栈且服务器也是双栈,默认情况下 IPv6 优先级高于 IPv4,应用程序优先使用 IPv6 地址。
理论上应该是如下情况:
- IPv4 Only 服务器优先通过新增的 WARP IPv6 网络去访问外部网络。
- IPv6 Only 服务器优先通过原来的 IPv6 网络去访问外部网络。
然而 WARP 的情况有点特殊,现实的情况有可能是:
- IPv4 Only 服务器优先通过原来的 IPv4 网络去访问外部网络。
- IPv6 Only 服务器优先通过原来的 IPv6 网络去访问外部网络。
所以根据实际的需求就要手动去设置优先级。
IPv4 优先
编辑 /etc/gai.conf 文件,在末尾添加下面这行配置:
precedence ::ffff:0:0/96 100
IPv6 优先
编辑 /etc/gai.conf 文件,在末尾添加下面这行配置:
label 2002::/16 2
验证优先级
执行 curl ip.p3terx.com 命令,显示 IPv4 地址则代表 IPv4 优先,否则为 IPv6 优先。
四、adguard
#官方的安装脚本
curl -sSL https://raw.githubusercontent.com/AdguardTeam/AdGuardHome/master/scripts/install.sh | sh
#默认安装在/opt/AdGuardHome

#或者通过wget下载程序主文件并解
wget https://static.adguard.com/adguardhome/release/AdGuardHome_linux_amd64.tar.gz
tar xvf AdGuardHome_linux_amd64.tar.gz
cd AdGuardHome
sudo ./AdGuardHome -s install
使用systemd来管理
systemctl start AdGuardHome.service # 启动服务
systemctl restart AdGuardHome.service # 重启服务
systemctl stop AdGuardHome.service # 停止服务
#解除53端口占用
systemctl stop systemd-resolved.service
systemctl disable systemd-resolved.service
手动更新Adguardhome
#下载最新版至tmp
wget -O '/tmp/AdGuardHome_linux_amd64.tar.gz' 'https://static.adguard.com/adguardhome/release/AdGuardHome_linux_amd64.tar.gz'
#解压最新版至tmp
tar -C /tmp/ -f /tmp/AdGuardHome_linux_amd64.tar.gz -x -v -z
#暂停运行
sudo /opt/AdGuardHome/AdGuardHome -s stop
#将最新版复制到安装目录
sudo cp /tmp/AdGuardHome/AdGuardHome /opt/AdGuardHome/AdGuardHome
#开始运行
sudo /opt/AdGuardHome/AdGuardHome -s start
五、添加IPV6地址
添加IPV6能在一定程度上解决奠信IPV4被QOS的问题
Hurricane Electric (简称:HE) 是一家位于美国的全球互联网服务提供商,大部分IPV6都会绕美
以下操作必须放行端口41防火墙!!!!!!!!!!!
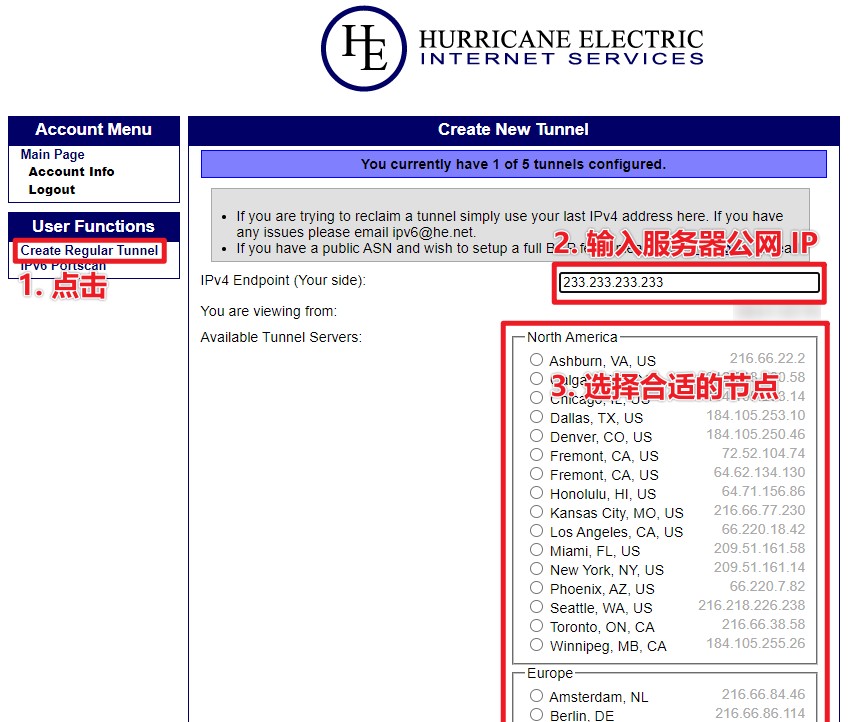
1.创建 Tunnel Broker IPv6 隧道
- 注册 Tunnel Broker 账号
- 点击左侧的
Create Regular Tunnel(创建常规隧道)- 输入 VPS 的公网 IP 地址
- 根据 VPS 的位置选择一个合适的节点
- 页面拉到最下方,点击
Create Tunnel(创建隧道)
2.添加IPV6
在 Tunnel Details 页面可以看到创建的 IPv6 隧道的详细信息,其中 Client IPv6 Address 是申请到公网 IPv6 地址。

在 Tunnel Details 页面有个 Example Configuration 选项卡,在这里你可以选择合适的配置示例。就比如这里有 Linux 的 interfaces 配置文件示例:

只要基于 Debian 的发行版和使用 interfaces 配置文件的系统理论上都可以使用。其它不兼容的发行版则可以使用 Linux-net-tools 或 Linux-route2 示例手动输入命令。
3.添加网络接口
将 配置添加到 /etc/network/interfaces.d/he-ipv6 和etc/network/interfaces文件中
auto he-ipv6
iface he-ipv6 inet6 v4tunnel
        address 2001:xxx:xxxx:xxxx::2
        netmask 64
        endpoint 216.66.80.30
        local 233.233.233.233
        ttl 255
        gateway 2001:xxx:xxxx:xxxx::1
如果是NAT类型的VPS,则需要将local的地址改为内网IP地址
4.启动IPv6 隧道
-
安装网络工具包
sudo apt update sudo apt install net-tools iproute2 -y -
启动
he-ipv6网络接口sudo ifup he-ipv6 -
启用后执行
ifconfig命令,这时应该有一个he-ipv6接口,类似下面这样:he-ipv6: flags=209<UP,POINTOPOINT,RUNNING,NOARP> mtu 1480 inet6 2001:xxx:xxxx:xxxx::2 prefixlen 64 scopeid 0x0<global> inet6 fe80::xxxx:xxxx prefixlen 64 scopeid 0x20<link> sit txqueuelen 1000 (IPv6-in-IPv4) RX packets 11605 bytes 3127821 (3.1 MB) RX errors 0 dropped 0 overruns 0 frame 0 TX packets 13811 bytes 2403522 (2.4 MB) TX errors 0 dropped 0 overruns 0 carrier 0 collisions 0 -
若没有生效可以尝试重启网络
sudo systemctl restart networking
5.检测 IPv6 支持
执行 ping6 google.com 命令,能 ping 通说明 VPS 已经支持 IPv6 网络了。
6.优先使用 IPv4 网络
默认情况下 IPv6 网络优先级会高于 IPv4 ,为了防止 IPv6 隧道拖慢 VPS 的正常网速,可以设置优先使用 IPv4 网络。同时也能减轻了对 HE Tunnel Broker 节点的网络压力,合理使用宝贵的免费资源。
编辑 /etc/gai.conf 文件,在末尾添加下面这行配置:
precedence ::ffff:0:0/96 100
一键添加命令如下:
echo 'precedence ::ffff:0:0/96 100' | sudo tee -a /etc/gai.conf
完事执行 curl ip.p3terx.com 命令,显示 VPS 的 IPv4 地址则代表成功。
7.删除 IPv6 隧道
当你不想用了,或者想使用其它方式访问 IPv6 网络时,记得先删除。
-
停用隧道
sudo ifdown he-ipv6 -
删除
he-ipv6网络接口配置文件(若没有删除重启后会自动启用)sudo rm -f /etc/network/interfaces.d/he-ipv6
评论区