使用Python将Pandas DataFrame转换为XMind思维导图
在数据分析和知识管理中,思维导图是一种有效的工具,用于可视化和组织复杂的信息。本文将介绍一个Python脚本,演示如何将Pandas DataFrame转换为XMind思维导图文件,适用于需要将结构化数据以直观方式呈现的场景。
一、主要功能
1. 脚本作用
该Python脚本的主要功能是将结构化的Pandas DataFrame数据转换为XMind思维导图文件。通过指定数据的层级结构,脚本能够自动生成多层级的思维导图,便于用户在XMind软件中进行进一步的编辑和分析。
假设你有一个包含以下列的Excel文件或其他数据源:
| L1 | L2 | 驱动杠杆 | 业务域 | 管理重点 | 分析主题 | 指标标准名称 |
|---|---|---|---|---|---|---|
| Level1_A | Level2_A1 | Lever_A1 | Business_A1 | Management_A1 | Analysis_A1 | Standard_A1 |
| Level1_B | Level2_B1 | Lever_B1 | Business_B1 | Management_B1 | Analysis_B1 | Standard_B1 |
通过运行该程序可以将其转换为带层级结构的为XMind思维导图:

二、实现方式
该脚本通过以下步骤实现将DataFrame转换为XMind文件的功能:
- 数据准备:使用Pandas读取和处理Excel文件,将所需的数据整理成DataFrame。
- 创建XMind工作簿:使用XMind库创建一个新的工作簿,并添加一个工作表。
- 设置根主题:在工作表中设置思维导图的根主题。
- 构建层级结构:根据DataFrame的列顺序,逐级添加子主题,形成多层级的思维导图。
- 保存并修复XMind文件:保存生成的XMind文件,并确保文件结构的完整性。
三、函数分析
本文的脚本包含两个主要函数:repair 和 dataframe_to_xmind。以下是对每个函数的详细分析。
1. repair 函数
功能作用:
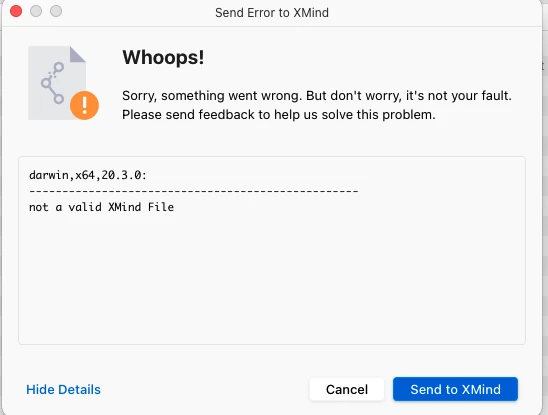
repair 函数用于修复生成的XMind文件,确保META-INF/manifest.xml文件存在且格式正确。这一步骤是为了防止XMind文件在打开时出现“not a valid XMind File”等错误。

输入项:
fname(str): 要修复的XMind文件的路径。
输出项:
- 无直接输出,但会在日志中记录修复结果。
重点逻辑解释:
- 使用
zipfile.ZipFile以追加模式打开XMind文件(XMind文件本质上是一个ZIP压缩包)。 - 将预定义的
manifest.xml内容写入META-INF/manifest.xml路径下。
代码示例
def repair(fname):
    """
    修复生成的 XMind 文件,确保 manifest.xml 存在且格式正确。

    参数:
    - fname (str): XMind 文件路径。
    """
    try:
        with zipfile.ZipFile(fname, 'a') as zip_file:
            manifest_content = '''<?xml version="1.0" encoding="UTF-8" standalone="no"?>
<manifest xmlns="urn:xmind:xmap:xmlns:manifest:1.0" password-hint=""></manifest>'''
            zip_file.writestr('META-INF/manifest.xml', manifest_content)
        logging.info(f"已修复 XMind 文件: {fname}")
    except Exception as e:
        logging.error(f"修复 XMind 文件失败: {e}")
2. dataframe_to_xmind 函数
功能作用:
dataframe_to_xmind函数将Pandas DataFrame转换为XMind思维导图文件。它按照DataFrame的列顺序,逐级添加子主题,构建多层级的思维导图结构。
输入项:
df(pd.DataFrame): 包含数据的DataFrame,列的顺序决定了思维导图的层级。output_file(str): 输出的XMind文件路径,必须以.xmind结尾。sheet_title(str, optional): 工作表的标题,默认为“工作表名称”。root_title(str, optional): 根主题的标题,默认为“根主题名称”。
输出项:
- 无直接输出,但会在指定路径生成一个XMind文件,并在日志中记录操作结果。
重点逻辑解释:
- 输出文件名验证:确保输出文件名以
.xmind结尾,否则抛出错误。 - 创建新的工作簿:使用
xmind.load("")创建一个空的工作簿。 - 创建新的工作表:在工作簿中创建一个新的工作表,并设置其标题。
- 设置根主题:为工作表设置根主题的标题。
- 构建层级结构:
- 遍历DataFrame的每一行,从根主题开始。
- 按照列的顺序,逐级检查并添加子主题。
- 如果当前主题已存在相同名称的子主题,则跳过创建,直接进入该子主题。
- 否则,创建新的子主题并进入下一层级。
- 保存并修复XMind文件:保存生成的XMind文件,并调用
repair函数确保文件结构完整。
代码示例
def dataframe_to_xmind(df, output_file, sheet_title="工作表名称", root_title="根主题名称"):
    """
    将 pandas DataFrame 转换为 XMind 思维导图文件,按照指定的层级结构展开。

    参数:
    - df (pd.DataFrame): 包含数据的 DataFrame,列的顺序决定了思维导图的层级。
    - output_file (str): 输出的 XMind 文件路径,必须以 '.xmind' 结尾。
    - sheet_title (str): 工作表的标题。
    - root_title (str): 根主题的标题。

    示例:
    dataframe_to_xmind(new_sheet, 'output.xmind', sheet_title='指标体系', root_title='指标体系')
    """
    try:
        # 确保输出文件名以 '.xmind' 结尾
        if not output_file.endswith('.xmind'):
            raise ValueError("The XMind filename is missing the '.xmind' extension!")

        # 创建一个新的工作簿
        workbook = xmind.load(output_file)  # 创建一个空的工作簿
        logging.info("已创建一个新的工作簿")

        # 创建一个新的工作表
        sheet = workbook.getPrimarySheet()
        sheet.setTitle(sheet_title)  # 设置工作表名称
        logging.info(f"已创建新的工作表: {sheet_title}")

        # 获取根主题
        root_topic = sheet.getRootTopic()
        root_topic.setTitle(root_title)  # 设置根主题名称
        logging.info(f"已设置根主题: {root_title}")

        # 定义列的顺序作为层级
        columns = df.columns.tolist()

        # 遍历 DataFrame 的每一行
        for index, row in df.iterrows():
            current_topic = root_topic  # 从根主题开始
            # 按照层级顺序遍历每一列
            for column in columns:
                sub_topic_title = str(row[column]).strip()
                if not sub_topic_title:
                    continue  # 如果单元格为空,则跳过

                # 检查当前主题是否已经有子主题
                sub_topics = current_topic.getSubTopics()
                if sub_topics:
                    # 查找是否存在同名子主题
                    found = False
                    for sub in sub_topics:
                        if sub.getTitle() == sub_topic_title:
                            current_topic = sub
                            found = True
                            break
                    if not found:
                        # 如果不存在,则创建新的子主题
                        new_sub = current_topic.addSubTopic()
                        new_sub.setTitle(sub_topic_title)
                        current_topic = new_sub
                        logging.debug(f"添加子主题: {sub_topic_title}")
                else:
                    # 如果当前主题没有子主题,则直接创建
                    new_sub = current_topic.addSubTopic()
                    new_sub.setTitle(sub_topic_title)
                    current_topic = new_sub
                    logging.debug(f"添加子主题: {sub_topic_title}")

        # 保存 XMind 文件
        xmind.save(workbook, output_file)
        logging.info(f"XMind 文件已保存到 {output_file}")

        # 应用 repair 函数修复文件
        repair(output_file)

    except Exception as e:
        logging.error(f"发生错误: {e}")
四、使用方式
以下是如何使用上述脚本的完整示例,包括数据准备、转换过程以及运行步骤。
1. 安装必要的库
确保你已经安装了pandas和xmind库。如果尚未安装,可以使用以下命令进行安装:
pip install pandas xmind
2. 准备数据
假设你有一个包含以下列的Excel文件或其他数据源:
| L1 | L2 | 驱动杠杆 | 业务域 | 管理重点 | 分析主题 | 指标标准名称 |
|---|---|---|---|---|---|---|
| Level1_A | Level2_A1 | Lever_A1 | Business_A1 | Management_A1 | Analysis_A1 | Standard_A1 |
| Level1_B | Level2_B1 | Lever_B1 | Business_B1 | Management_B1 | Analysis_B1 | Standard_B1 |
可以使用Pandas将这些数据加载到DataFrame中。以下是一个示例数据集:
# 示例 DataFrame 数据,可以替换为实际数据加载
data = {
    'L1': ['Level1_A', 'Level1_B'],
    'L2': ['Level2_A1', 'Level2_B1'],
    '驱动杠杆': ['Lever_A1', 'Lever_B1'],
    '业务域': ['Business_A1', 'Business_B1'],
    '管理重点': ['Management_A1', 'Management_B1'],
    '分析主题': ['Analysis_A1', 'Analysis_B1'],
    '指标标准名称': ['Standard_A1', 'Standard_B1']
}
df = pd.DataFrame(data)
3. 转换为XMind思维导图
运行以下脚本,将DataFrame转换为XMind文件:
import pandas as pd
import xmind
import logging
import zipfile

# 配置日志
logging.basicConfig(level=logging.INFO, format='%(asctime)s - %(levelname)s - %(message)s')

def repair(fname):
    """
    修复生成的 XMind 文件,确保 manifest.xml 存在且格式正确。

    参数:
    - fname (str): XMind 文件路径。
    """
    try:
        with zipfile.ZipFile(fname, 'a') as zip_file:
            manifest_content = '''<?xml version="1.0" encoding="UTF-8" standalone="no"?>
<manifest xmlns="urn:xmind:xmap:xmlns:manifest:1.0" password-hint=""></manifest>'''
            zip_file.writestr('META-INF/manifest.xml', manifest_content)
        logging.info(f"已修复 XMind 文件: {fname}")
    except Exception as e:
        logging.error(f"修复 XMind 文件失败: {e}")

def dataframe_to_xmind(df, output_file, sheet_title="数据治理指标体系", root_title="指标体系"):
    """
    将 pandas DataFrame 转换为 XMind 思维导图文件,按照指定的层级结构展开。

    参数:
    - df (pd.DataFrame): 包含数据的 DataFrame,列的顺序决定了思维导图的层级。
    - output_file (str): 输出的 XMind 文件路径,必须以 '.xmind' 结尾。
    - sheet_title (str): 工作表的标题。
    - root_title (str): 根主题的标题。

    示例:
    dataframe_to_xmind(new_sheet, 'output.xmind', sheet_title='指标体系', root_title='指标体系')
    """
    try:
        # 确保输出文件名以 '.xmind' 结尾
        if not output_file.endswith('.xmind'):
            raise ValueError("The XMind filename is missing the '.xmind' extension!")

        # 创建一个新的工作簿
        workbook = xmind.load(output_file)  # 创建一个空的工作簿
        logging.info("已创建一个新的工作簿")

        # 创建一个新的工作表
        sheet = workbook.getPrimarySheet()
        sheet.setTitle(sheet_title)  # 设置工作表名称
        logging.info(f"已创建新的工作表: {sheet_title}")

        # 获取根主题
        root_topic = sheet.getRootTopic()
        root_topic.setTitle(root_title)  # 设置根主题名称
        logging.info(f"已设置根主题: {root_title}")

        # 定义列的顺序作为层级
        columns = df.columns.tolist()

        # 遍历 DataFrame 的每一行
        for index, row in df.iterrows():
            current_topic = root_topic  # 从根主题开始
            # 按照层级顺序遍历每一列
            for column in columns:
                sub_topic_title = str(row[column]).strip()
                if not sub_topic_title:
                    continue  # 如果单元格为空,则跳过

                # 检查当前主题是否已经有子主题
                sub_topics = current_topic.getSubTopics()
                if sub_topics:
                    # 查找是否存在同名子主题
                    found = False
                    for sub in sub_topics:
                        if sub.getTitle() == sub_topic_title:
                            current_topic = sub
                            found = True
                            break
                    if not found:
                        # 如果不存在,则创建新的子主题
                        new_sub = current_topic.addSubTopic()
                        new_sub.setTitle(sub_topic_title)
                        current_topic = new_sub
                        logging.debug(f"添加子主题: {sub_topic_title}")
                else:
                    # 如果当前主题没有子主题,则直接创建
                    new_sub = current_topic.addSubTopic()
                    new_sub.setTitle(sub_topic_title)
                    current_topic = new_sub
                    logging.debug(f"添加子主题: {sub_topic_title}")

        # 保存 XMind 文件
        xmind.save(workbook, output_file)
        logging.info(f"XMind 文件已保存到 {output_file}")

        # 应用 repair 函数修复文件
        repair(output_file)

    except Exception as e:
        logging.error(f"发生错误: {e}")

# 示例使用
if __name__ == "__main__":
    try:
        # 示例 DataFrame 数据,可以替换为实际数据加载
        data = {
            'L1': ['Level1_A', 'Level1_B'],
            'L2': ['Level2_A1', 'Level2_B1'],
            '驱动杠杆': ['Lever_A1', 'Lever_B1'],
            '业务域': ['Business_A1', 'Business_B1'],
            '管理重点': ['Management_A1', 'Management_B1'],
            '分析主题': ['Analysis_A1', 'Analysis_B1'],
            '指标标准名称': ['Standard_A1', 'Standard_B1']
        }
        df = pd.DataFrame(data)

        # 设置输出文件名
        output_file = 'output.xmind'

        # 将 pandas DataFrame 转换为 XMind 思维导图文件,按照指定的层级结构展开
        dataframe_to_xmind(df, output_file, sheet_title='指标体系', root_title='指标体系')

    except Exception as e:
        logging.error(f"运行失败: {e}")


评论区